Home Home About me Home tour Projects Photos Image Map
Showing posts with label DIY. Show all posts

February 24, 2014

Party: A Fox 2nd Birthday


Our littlest recently turned two, and it's like a switch was thrown.  He has tried every bit of patience I have in my body.  But it's ok, he makes up for with his kisses and cuddles, so we'll let him slide this time.


You know those trends you see on Pinterest and you can only hope to be so cool?  Well I think I finally managed to "be cool".  I had big ideas for Little Man's 2nd birthday.  I'm talking arrows and teepees and little craft stations for all the kids.  Then I remembered that he's turning two and doesn't really have friends yet (he stays home with me all day).  So I backed up and went back to the drawing board.  Or as I like to call it, Pinterest.

I came up with foxes.  What's cooler than foxes right now? Probably a lot of things but do me a favor and keep them to yourself.  I wanted to keep it simple *read: cheap, so I choose two colors and an accent to mainly decorate with.  Then I set out to hand make anything I could.


Source List:

Cupcake toppers: handmade with card stock
Mossy Two: Cardboard letters and moss from Hobby Lobby
Paper Straws: Knot & Bow etsy shop
Glitter "2" candle: Dollar store candle covered in glitter
Goodie Bags: Bags from Hobby Lobby, handmade foxes
Fox masks: handmade
Fox sign: Handpainted
Marshmallow stand: styrofoam covered in moss from JoAnns


Here are a few photos taken during the party thanks to my wonderful neighbor :)

The girls loved Little Man's birthday present
please ignore my hideous face!! and apparently I have multiple chins 

 Little Man blew his own candle out and then tore into his gifts.  We are very blessed to have so many loving family and friends to surround us.


we three sisters, who dress alike and act alike :)
It's a troop of foxes! I totally googled what a group of foxes was called. 
 Thanks to much! I hope you enjoyed it and can reap inspiration from it all!

xo, Stacie

February 5, 2014

DIY: Easy Pendant Banner


Holy bananas!  Who pissed off Queen Elsa?!  I don't know about you but ain't nobody got time for all this snow and ice we're getting around here.  I've been attempting to create projects around the house that require me to not leave the house. Mainly because I can't. Leave, that is.


Last night I whipped up this cute little pendant banner for Little Man's new big boy room. I'm just not cool enough to throw things in a room and make them look awesome, so I came up with a theme to keep me on track. His rooms theme is travel/little explorer. So this "brave" banner fits in nicely. 

All you need for this quick project is:

Felt- 2 pieces
A dowel rod 
String
Glue
Scissors
Pins
Needle and thread or sewing machine


Start by deciding what you want your banner to say. Remember to keep it simple and short but fun!  Brave boys only barely fit!  After you decide your saying, trace the letters out on your felt. 


Fold your second piece of felt hotdog style and cut the felt into pendant shape. Place your dowel rod at the top and fold over the rod to form a tunnel. Pin your felt so that you can keep it at a straight line (or if you're a beast, eyeball that ish and then celebrate because you're a beast). Using your sewing machine, or by hand, sew a straight line on your folded over felt. When you're done, you should be able to stick your dowel rod all the way through. 


After carefully cutting out your letters while watching your oldest kid play in the snow through a window because your littlest doesn't like playing in snow up to his knees (or you could just cut the letters out. It's up to you), arrange them on your banner how you want them to look. Carefully apply the glue (I used tacky glue) so that when you press down the glue doesn't come squirting out the edges. Glue down all your letters and then tie your string to the dowel rod so you can hang it up!


Tada! Easy diy pendant banner! You can customize this however you want. And if I were to add up how much it cost, it would be under $5 but I had everything on hand from various projects and birthday parties. This is a great time passer if you are also stuck inside this week. Fingers crossed this winter storm is over soon!!

Xo Stacie

January 22, 2014

A few Lovely decorations

Valentine's Day is quickly approaching now. Are you ready? We don't really buy presents for V-day, mostly chocolates, so I like to wait till the last minute and then scrounge around for whatever's left. He does the same. It's almost like a game.

This year I wanted to add a little color in our house for Valentine's day. The hubs said I couldn't spend any money doing so. Challenge accepted. Here's the few decorations I threw up. 

                                 
Throw some paint on some already cute wood scraps and you have some easy decor!

                                              
I punched out hearts from all those paint chips I had the hubs and Little Miss pilfer for me. Glue them on some string and you have a super cute garland!


The felt ball garland I made has a new home on our gallery wall. The tutorial for how to make one is here. 

                                         
Little Miss requested a garland in her room too so I just glued the punched out hearts on string again. This is her favorite decoration. 

I couldn't not put up the small pink tinsel tree we picked up the day after Christmas. I let the Littles decorate it and I even stopped myself from redecorating it!

                                              
Not bad for zero money spent! And I'll most likely hang my garlands up in my craft room after the holiday is over!

Do you decorate for Valentine's Day? 

Xo Stacie

January 17, 2014

Homemade Dog Treats


We ran out of dog treats this week (most likely because the kids love doling them out every five seconds), and instead of hopping in the car and buying some, I thought, I'll make some!  Because that's what normal people do, right?

I found this recipe here, and thought it looked easy enough.  I decided to swap out peanut butter for the almond butter I had tried to pass off on the kids as peanut butter but they were not fooled by my trickery (very few are).  Here's the recipe I used:


Homemade Dog Treats

1/2 cup water
1/2 cup oil
2 eggs
4 tbsp. almond butter (or peanut butter)
1 tsp. vanilla
2 cups flour
1/2 cup oats
1/2 cup cornmeal

Blend the water, oil, eggs and vanilla together in a large mixing bowl.  In a smaller separate bowl, whisk together the flour, cornmeal, and oats and pour into the wet mixture.  Mix together.  Add in your almond (or peanut butter) and mix all the ingredients until it forms a dough.


Bake for 20 minutes at 400 degrees.  After the 20 minutes, turn the oven off and leave the treats in the oven until they are cool and crisp.

gotta let the dogs lick the bowl, right?  Don't judge!
The almond butter did leave the house kinda stinky, but the dogs gobbled these treats up like it was their last meal!

Enjoy and have a great weekend! We finally got enough snow to play in, so we will be outside building Olaf from Disney's Frozen.

xo Stacie

January 15, 2014

A Valentine's Felt Ball Garland


I've wanted to attempt to make felt balls for decoration ever since I saw them on Pinterest (pinterest, that dirty dog, making us want to do things).  So I finally broke down and bought some wool roving off Amazon (Hobby Lobby also sells it) in pinks and purples.  There are many stores on Etsy that sell the felt balls already made, but, like a crazy person, I thought, I can do that myself.   So here's how:


What you need:
-wool roving
-scissors
-hot water
-dish soap
-string ( I used embroidery thread)
-a needle (on the larger side)
-patience
-a good show on Netflix (I started Scandal and am. hooked.)


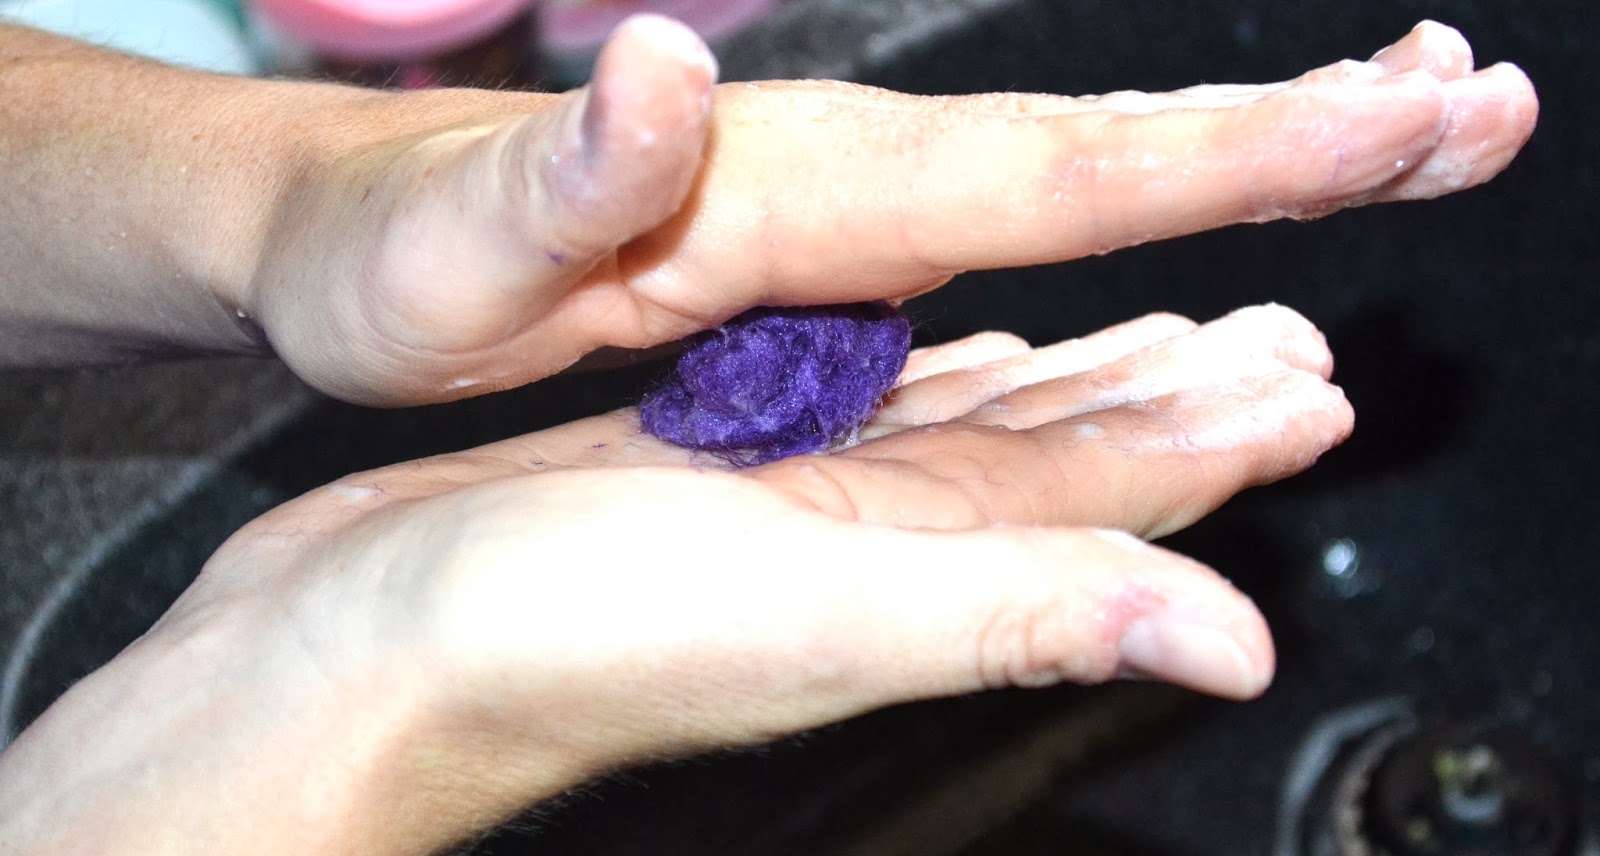
Cut your wool roving into small even pieces (obviously mine were not very even), about 2-3 inches.  Pull a tiny bit off each section and set aside.  I added a squirt of soap to a small container of hot water to use.  Dip your wool into the water solution and get it soapy.


 Start rolling your hands around to make it into a ball (think snowballs).  Once it's a ball, rinse it, roll some more, and rinse again.  If the ball is a little messy, take that extra piece you set aside and wrap it around your ball, dip in the water and roll again.  These took a while, you end up with VERY water logged hands, but they sure are pretty.


Will I make these again? Probably because like I said above, I'm a crazy person.  Do I recommend it? Not really.  Spend the extra five dollars and just buy them pre made.  It would save you some hassle, although my hands were super clean.


I let mine dry over night and then some because life got in the way.  When your felt balls are dry, line them up in the color order you want.  String your needle and start threading.  The best thing about these? They stay in place on the thread so all you have to do is string them on!


Putting the garland together was a cinch and took about five minutes (but I still sat and watched an entire episode of Scandal).  I'm using my pink and purple garland as a Valentine's Day decoration, but it will most likely end up in Little Misses room after the holiday.


Whats a craft project you thought you could make at home easier and it turned out buying premade would of saved you your sanity?

xo Stacie

January 10, 2014

Easy Artwork for a Little Ladies Room


I told myself that this year I would kick butt on writing posts.  At least three a week, if not more.  I am officially breaking my resolution on January 10th.  I am that person.  Life happens, I won't make excuses, although we have valid ones.  Mainly, I haven't really done much lately.  A mermaid birthday and Christmas in the same month have wore me out.  I put my sewing machine away for the party and haven't taken it out yet.  


Today I have a simple art project that I whipped up in, oh, five minutes for Little Misses room.  


All you need is a small canvas (got mine at Michael's as a two pack and with a 50% off coupon it was only 3.50), a cute-shaped hole punch (also at Michael's in the dollar bins), a ruler, and those wonderful paint color cards that when you swipe them you feel as if you are stealing and look around to make sure the workers are not watching you as you stuff them in your bag.  Or make your kid swipe them as I did.  And a pencil and some glue.


The most time consuming thing about this project is punching out the shapes you want.  I only had the little tiny butterfly punch on hand so that is what I used.  I decided instead of lots of colorful shapes to do an ombre effect.  I used a color swatch card that has the three different colors on it for mine.  I only needed four cards total so in hindsight, the 50 plus cards I swiped made Little Miss swipe, were not needed, but I'm sure I can find a good use for them sooner or later.


Using your ruler, mark out where you want each shape.  Or if you are a boss, you can just eyeball it.  I'm not that good....yet.  I will be a boss one day. Then just glue your shapes down.  Ta-da! Told you it took about five minutes.  I honestly thought my punch was ten times bigger than this, but Little Miss thinks it's cool and thats all that matters.  


I'm working up my nerve to post pictures of what my house actually looks like (even though most readers are my family and they know already) because I'm trying really hard this year to not compare myself to others, and to covet what they have.  So I want to be realistic for you guys, because the majority of America is not rich, does not have a perfect house, and most likely the way the economy is, never will.  So I vow this year to be realistic and show how "normal" awesome people like me live and try to make their house a home (you know, what I set out to do in the first place here).  So this weekend I will be psyching myself up to post those horrendous photos.  Watch out!!  

Y'all have a great weekend!

xo Stacie


LinkWithin

Related Posts Plugin for WordPress, Blogger...
09 10 11 12
Blogging tips