Home Home About me Home tour Projects Photos Image Map
Showing posts with label family. Show all posts

January 3, 2014

An Under the Sea Mermaid party


*warning, I just photo bombed the crap out of this post!*

Over the summer our family went on an awesome vacation to the Florida Keys.  And we drove there.  From Kentucky.  All 17 hours.  It was a wonderful time spent with my entire side of the family all on the beach together.  On the way home we stopped in Tampa and spent time with my grandmother.  The kids were awesome in the car on the way to Tampa.  So we decided not to chance it and bribed the then three year old.  What did she want? An Ariel party.  Her birthday is in December so I (being one who hates all things characters splashed all over the place) just figured she'd forget about the whole thing.  We're talking six months.  Did she you ask? No.  Not. At. All.


Can't have an Ariel party without a "dinglehopper"!


A hand drawn giant Ariel coloring sheet kept the littlest kids entertained while the older ones played together.
Please ignore Ariel's horrible mouth and hand, I finally realized the kids would not care so I shouldn't either.
So enter a Little Mermaid party without being oppressively Ariel-ified.  I know she wouldn't of cared either way if there were pictures of Ariel everywhere you turned, but I just can't do it, just can't.  It's my own preference and I'm okay with it, and the family is beginning to understand too (although they loaded her up with some Princess shirts at Christmas and I've even been nice enough to let her wear them, to bed).  We choose the theme of Under the Sea Mermaid, it encompasses the movie without me having to print off ten thousand Ariels.

We made some super easy and tasty "sea glass" using this recipe.


homemade salt water taffy was a big hit with the younger crowd (very sweet)
purple pearl sixlets were often swiped by the younger brother *can't say I blame him*

I let her pick the colors for the party because I'm not a complete control freak (yes I am, who am I kidding).  She picked teal and purple, which might of been because she was holding an Ariel doll at the time and that's what she was wearing.  I added gold because I am slightly obsessed with that color right now.  I took it and ran.  Literally.  These kids just follow me everywhere so I have to run away and hide a lot if I want to play on Pinterest all day.  (totally kidding, sorta.)

a tissue paper garland that was super easy to make decorated the dessert table
So I was blessed with six months to plan for this little misses birthday party (to which I only actually did any planning the last month).  Having that much time to think about pin ideas on Pinterest and then forget about, gave me time to shop cheaply.  I'm happy to say I spent WAY less on her party by planning a little earlier than I would of.  I also made almost everything that I possibly could, including the party favors and candy!

oh look I finally finished that gallery wall I've been talking about for months!
blue kool-aid served as "sea water" which the kids loved!
barnacles, get it? :)

I completely forgot to save an invitation to post on here.  They were a true labor of love and I will probably never make invitations again.  We used card stock and cut out a billion sea shell shapes.  Add some glitter and a puff paint pearl, some ribbon and you have a beautiful shell invitation.  I used this picture from Pinterest for inspiration.

I always go slightly overboard on the dessert table and this party was no exception.  Homemade candies, cupcakes, cake, chocolate covered pretzels, oreo balls.... we feasted on some sweets.


A gift table decorated with paper garlands and goodie bags.


super easy paper garland.  Seriously these are going to be a stable from now on.


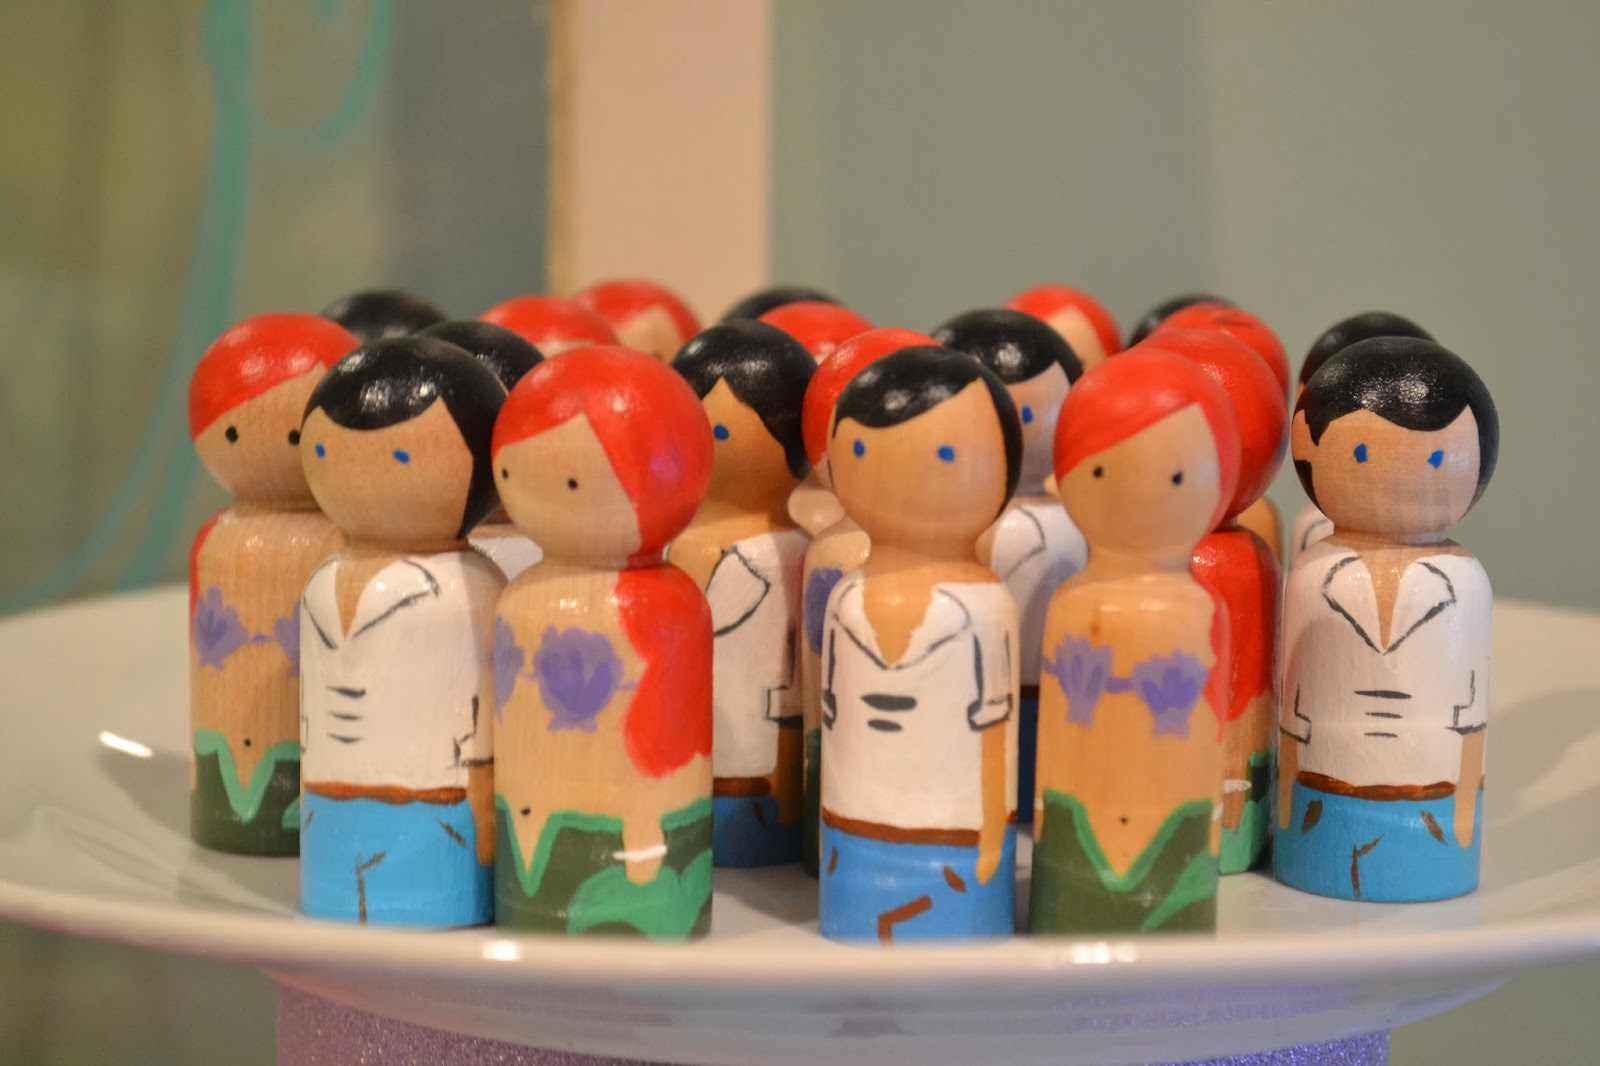
 Party favors were simple but fun! Hand painted Prince Eric and Ariels all around!  And let me tell you, these took forever to make but I was lazy about it and laid in bed watching Hallmark Christmas movies while painting these bad boys.  Little Miss still plays with her Ariel (Prince Eric is not cool because he is not a princess).  Parchment paper bags with gold polka dots contained all the goodies (including the array of candy on the dessert table).


Although this party took a while to plan, I had so much fun pulling it all together.  We had a blast during the party, I never even picked up my camera!! And clean up was actually very easy compared to past parties so I was one happy momma.  And the smiles on Little Misses face were priceless.  She loved it all, especially when all her friends showed up.

Little man's birthday is in a month.  I just got started with ideas.  But he's two, he doesn't care.  He just wants to lick icing off cake and open presents (it's the little things in life ya know).  I promise I will take better pictures of his party ( it is one of my New Year's resolutions you know!) and hopefully we'll have this computer fixed up so I can actually edit them!

Thanks for making it through this long photo bombed post! Hope you have a great weekend!

xo Stacie

December 2, 2013

It's a little late, but it's the thought that counts right?


Okay okay, so it's December 2nd and I'm just now posting about our advent calendar.  But, well, (enter excuse here).  To be honest, I've just been lazy with the blogging. Our computer is still on the fritz so doing everything by phone is annoying!  Maybe Santa will bring me a new computer (yeah right, I pay Santa's bills, he's broke).  I also only took one iPhone photo of the actual advent calendar. Forgive me.

So the advent calendar is a new tradition in our house this year. Little Miss is slowly starting to understand days of the week so this is also an exercise in that (gotta make everything educational right?).  I didn't have a whole lot of money to spend on one, especially this time of year so I wanted to use things I already owned (or needed to buy for a certain little lady's birthday coming up next week).  


Supplies needed for this project:

-a large chalkboard (like the one I made here)
-parchment paper bags (25 for $2 at Hobby Lobby)
-glitter!
-numbered stamps (I borrowed from my awesome mother in law)
-stamp pad
-rubber glue or mod podge
-washi tape
-string (I used bakers twine I got on clearance)
-craft paper (my husband had a ginormous roll in the garage so I stole it for myself)
-clothespins (buy these at the dollar store)


It seems like a lot of supplies but you can make your bags as elaborate or as plain as you choose. I sat on the couch and watched a movie while I made mine and it. Was. Wonderful. That is MY time and I enjoy being able to do two things together like that. 


I just stamped the date on the bags (truth: I forgot dec 11th), then added some glitter underneath because they were a little too plain for me. I had originally planed on hanging them on a different board so I had added the craft paper cutouts, however when I moved them to their final resting place, the craft paper isn't really seen. Which also makes the bakers twine I used to tie the paper to the bags obsolete too. Oh well. See, now you don't have to waste your time, unless you stopped reading at the supplies list and already started. Sorry. 

I'm on a budget, and with two kids in the house I wasn't about to buy little toys for each for 25 days. So candy it was. I alternated between Hersey kisses and mini candy canes. I also ate the leftover kisses as I made the calendar. Then I hated myself a little. Then I ate some candy canes and got over it. 


Seal your bags with washi tape and pin to your board (I put mine in order by date).  I wrapped lace I already had on hand (I think I paid 1.00 for it at a thrift store) around my board but any string will work (oh look, you can use that bakers twine if you want!!). I'm pretty happy with the way it turned out. Maybe when the kids are older well invest a little more money into the calendar, but for now, the kids are just happy that I'm letting them eat candy every day. 


What does your calendar look like? Did you start late this year (my kids can't tell the date yet)? Let me know! Don't forget to follow on Instagram for real time pictures(because I actually post things on there). 

~enjoy!
xo Stacie


November 18, 2013

Turkey meatloaf so good your husband will think it's beef


We've always been beef lovers at this house. Yet when our children grew teeth and became carnivores like the rest of us, our tastes needed to shift. Red meat is great, tasty filling greatness. But not super healthy. I want our kids to grow up with diverse taste buds (including those pesky vegetables no one ever wants to eat). So we buy turkey meat. A lot. Not only is it slightly healthier, it's cheaper!!


I make lots of things with turkey meat that I would normally make with ground beef. My favorite? Meatloaf. The hubs was so nervous when I first pulled it out of the oven that it wouldn't be near as good as beef. And it took a few tries, but I got this 'ish now. Now when I make it, I don't tell him it's turkey until he's had a bite and remarked on how good it tastes. Oh yeah. High five to me. 

Let me share my secret recipe with you. 


Combine all the ingredients together but the ketchup and mush (that's a technical term there folks) it into a loaf shape in your pan. Cook for an hour and a half to an hour forty-five minutes (or if you have one of those fancy meat thermometers turkey is done at 145 degrees f). 


Sometimes I switch it up and add onions and peppers, but I don't always have those on hand (honestly I just hate cutting onions). 


The kids eat every bite (ok not all the time because they are three and one and comeon) and sometimes ask for seconds!  Meatloaf is a great comfort food and why not make it a little healthier?


How do you like your meatloaf? What are your favorite side dishes?

~Enjoy
xo Stacie

October 30, 2013

The Prince is in the House


I consider myself a pretty crafty person (hence the blog), but using a sewing machine has always been outside my realm.  Most likely because I didn't own one, and I have a short patience stick (no wonder the kids have zero patience).  But I gave in this year, and I bought myself a pretty cheap sewing machine that would fit my needs of making a few pillows and maybe attempting a pair of pj pants (high hopes, gotta have 'em).


Enter Halloween.  And a daughter who I will do anything for, and you've got me making an Ursula costume and a Prince Eric costume.  Why? Because to say that child is obsessed with the Little Mermaid is an understatement.  She asked me if she could be Ariel, her little brother Prince Eric and mommy? Oh I get to be the bad girl, Ursula (maybe I sent her to time out that day?), yay me!  Sidenote* she asked if daddy could be King Triton but it is too cold here for him to be running around shirtless.*


We decided to buy her Ariel costume from the Disney store because we are planning a trip to Disney in April (don't worry I'll post on that soon enough too) and I want her to have one I know will hold up.  And trust me, she's already wearing that thing every. single. day.  Prince Eric on the other hand? Nope, they don't sell toddler size Prince Eric costumes, at all.  Even the ones on Etsy.com were close to $100 and sorry, momma don't roll like that.


Even Pinterest failed me on tutorials for a Prince Eric costume.  Good thing Little Miss has a doll so I knew what he looks like all fancy and such.  I found this awesome tutorial of a Prince Charming costume that I followed closely, changing up where they differed (like the front of the shirt).  She does an awesome job detailing how to do everything, including linking back to how to make pants (which I totally used, first time sewing machine user over here).


I wasn't sure how to sew the gold lining on the pants, so I cheated and hot glued it on (he doesn't play dress up like his sister so he won't be wearing it a lot), along with the gold neck liner and cuffs.  I think for my first attempt at pretty much anything, I did a decent job. I wasn't brave enough to try making the fancy shirt with the tails that Prince Eric wears, so I bought a $4 long sleeve tee and went to town on that sucker.


I wanted to share this costume with you guys because there are so many times I see someones post on Pinterest and I drool (and drool some more), and then chicken out when it comes to actually attempting.  It wasn't that hard.  And the best part? I spent less than $17.  SCORE!! And don't worry, I'll update with a picture of Little Mister actually in the costume as soon as he will cooperate and wear it.  Happy Halloween ya'll!

Enjoy~
xo Stacie

October 4, 2013

A Console table even yo' momma would be proud of


Our living room is super odd shape, like there are some stairs just chilling, in the living room, sometimes they watch cartoons with us.  Decorating, and more importantly, furniture arrangement has been tough.  So much so, that we just didn't do it.  Don't get me wrong, we had some style in that room, but nothing like you see in a magazine (you know the ones, you sit there and drool over them and pin them and then pretend you can afford them).  Slowly, veeeerrrryyy slowly, we are upgrading the living room to be more of a family room.  


One new addition that we've put in is a new console table.  Most of these console tables will go behind your average couch, ours? Nope, it is chilling in front of those stairs that enjoy episodes of New Girl with me.  We needed something that would hold our DVD player and cable box and router and what not.  However, we couldn't have your average tv stand/media center due to the big hulking stairs and little ones whose goal in life is to scare the crap out of their parents.  Plus, nice tall tv stands were over $150 and well, that darn poor thing just keeps getting in our way.  

So finally, finally, I convinced the hubby to build me a tall table.  Ok, truthfully, I really wanted an old dresser there but the hubs doesn't care for that kind of style and this is what we compromised on (alright, I caved once he said, I'll build it myself, nothing is sexier than a man building you something).  


I just want to warn you, this sucker is built entirely out of 2x4's!! That's right, 2x4s!!! say whhaaaa?? 


Folks, this table is NICE.  I was playing researching on Craigslist and a very similar table was for sale for almost $200! This one cost us maybe $40 to make but we also had all the wood already.   We followed Ana White's tutorial a little but kudos to the hubs because he pretty much just looked at her design and went to town.  But then, again he is a carpenter for a living so he's got an eye for this stuff (but it also means he doesn't really want to come home and build things either, sad face for me).  Expect a tutorial on how he did this easy peasy in the coming days.  


You can see some of our Halloween decorations have already made the table.  I still need to find baskets to put on that shelf but can't decide on the look I want yet.  I am so excited to start decorating this for holidays (and don't you worry, Target is already getting rid of Halloween and putting out Christmas) and hang our stockings from it and love on it and give it a name and...... you get the point.  I love our new table, and the fact that the hubs hand built it, just means it's loved that much more.

the whole family got in on this thing! Sanding machine she was!
Hope you all have a great fall weekend! Go pick some apples or pumpkins! We are headed up north for that wedding I was telling you about here, and we are mighty excited for some family time!

What are your favorite baskets to decorate with, and where do you find them?

Enjoy~
xo Stacie


LinkWithin

Related Posts Plugin for WordPress, Blogger...
09 10 11 12
Blogging tips